Part 1: How to Transfer Photos from Computer to iPhone via iPhone Photo Transfer in 1 Click
Part 2: How to Transfer Pictures from Computer to iPhone via iCloud
Part 3: How to Transfer Photos to iPhone with Google Photos
Part 4: How to Transfer Photos from PC to iPhone via iTunes
Part 5: How to Get Pictures from Computer to iPhone with Dropbox
Part 1: How to Transfer Photos from Computer to iPhone via iPhone Photo Transfer in 1 Click
If you want to find a great photo transfer app, this part is your best choice. iPhone Photo Transfer is a photo manager for everyone, and it allows you to asily transfer photos to iPhone from the computer without iTunes. In addition, it can also help you transfer music, videos, contacts and more from iPhone to the PC. Have a try and you will love it.
Highlights and advantages of iPhone Photo Transfer:
> Transfer photos from computer to iPhone and vice versa quickly.
> Transfer music, contacts, messages, videos and voice memos from iPhone to computer.
> You can transfer all data from iPhone to computer with 1 click.
> Support to import iTunes data to iPhone or computer breezily.
> Widely compatible with iPhone 11 Pro/11/XS/X/8/7/6, iPod touch 5/4/Shuffle/Nano/Classic, iPad Pro, the new iPad, iPad Air, iPad 2/1, iPad Mini and etc.
Welcome to download iPhone Photo Transfer for free.
Tutorial on how to transfer pictures from computer to iPhone with iPhone Photo Transfer:
Step 1. Download and Install iPhone Photo Transfer
Above all, download and install iPhone Photo Transfer on your computer. Please notice to download the correct version on your Windows PC or MacBook. After installing, run the app.
Step 2. Connect iPhone to Computer
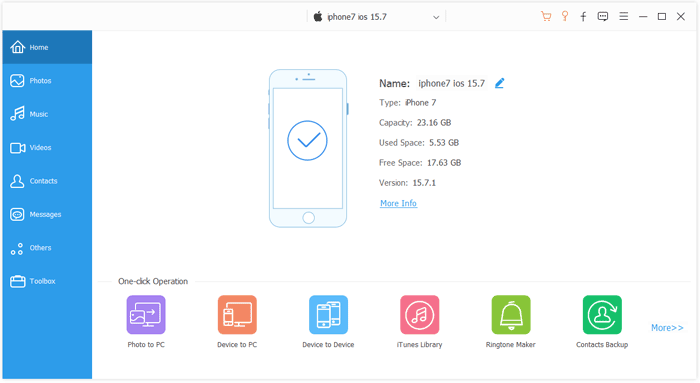
Next, you need to connect your iPhone to the computer via a USB cable. iPhone Photo Transfer will recognize your mobile phone in seconds.
Step 3. Transfer Photos to iPhone
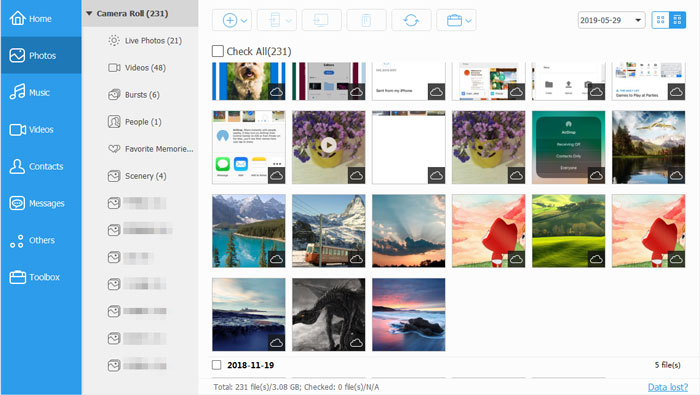
- On the main interface, click the "Photos" on the left panel, and then you will see your photos folders on the middle part. Navigate the folder you want to transfer the photos and tap on the "Add" icon on the top menu.
- Open the photos folder on the computer, you can select the photos on the screen, and then click the "Open" icon. The selected photos will be transferred from the PC to your iPhone.
Tips:
The detailed guide on how to back up iPhone photos to computer is here. Let's check it out.
Follow simple steps to export iPhone photos to an SD card if needed.
Part 2: How to Transfer Pictures from Computer to iPhone via iCloud
When you enable iCloud on your iPhone, you will achieve the transfer of photos from PC to iPhone. That is, we will introduce how to transfer photos from PC to iPhone with iCloud in this part. There is 5 GB free space for every iPhone user, so you can add photos to iPhone conveniently when your Wi-Fi is available.
Steps on how to get pictures from computer to iPhone:
Step 1. Enable iCloud on iPhone
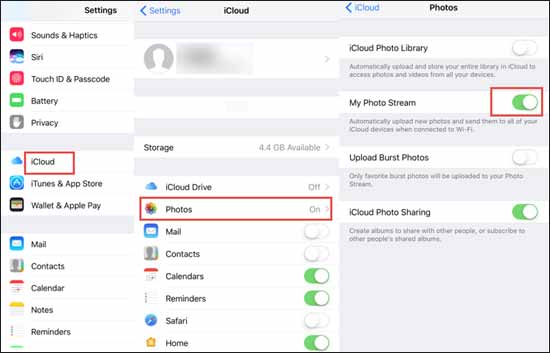
First, you need to check whether you enable iCloud Photo Library on your iPhone. Go to the "Settings" and tap on your name. Choose the "iCloud" and "Photos". Turn on the "My Photos Stream" icon.
Step 2. Login iCloud on the PC
Open your browser and go to iCloud website with your Apple ID. When you enter successfully, you can see your files on the PC.
Step 3. Upload Photos to iCloud
On the computer, click the "Photos" option. Then tap on the "Upload" button on the upper right. Now, you can pick out your photos on the computer. Highlight the photos and click the "Open" icon on the pop-up page.
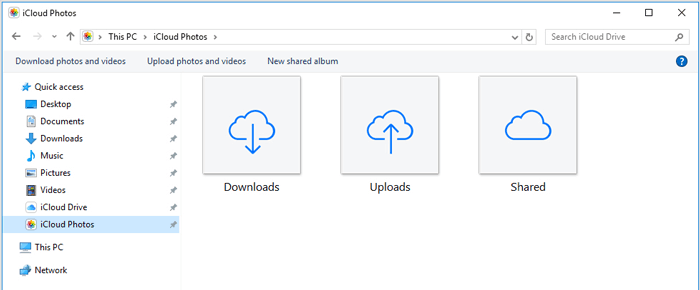
Step 4. Go to Photos App
Finally, once the photos uploaded to iCloud, you will see them on your iPhone Photos app. The uploaded photos will be auto-sync to your iPhone as the Wi-Fi available.
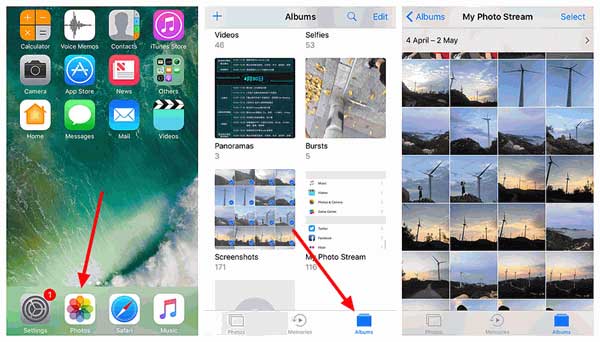
Tips: If you don't want to browse iCloud on the web all the time, you can choose to download the iCloud app on your computer.
Maybe you like: If your computer is Mac, maybe you need the guide on how to transfer photos from iPhone to Mac.
Part 3: How to Transfer Photos to iPhone with Google Photos
When you run out of the free storage of iCloud, you can get another app to transfer the photos from the PC to iPhone for free. That is Google Photos. It is a useful method to work out how to how to import photos from computer to iPhone. Every Google user has 15 GB free space to upload the files from your iPhone or other devices to their Google account, like Google Photos and Google Drive.
Here is how to transfer photos from computer to iPhone via Google Photos:
Step 1. Log in to Google Photos on PC
To start with, you need to log in to the Google Photos on the computer. You can choose to login on the web directly or download the app on the app on the computer.
Step 2. Input Photos from PC to Google Photos
- On the Google Photos, you'd better create an album firstly. Tap on the "Album" categories on the left column, and then click the "Create album ". You can type down a name for your new album.
- Then press the "Select from computer" on the top right corner. There will be a pop-up window on the screen and you can choose the pictures from the folders on your PC. Click the "Open" icon. Then pictures will be uploaded to Google Photos.
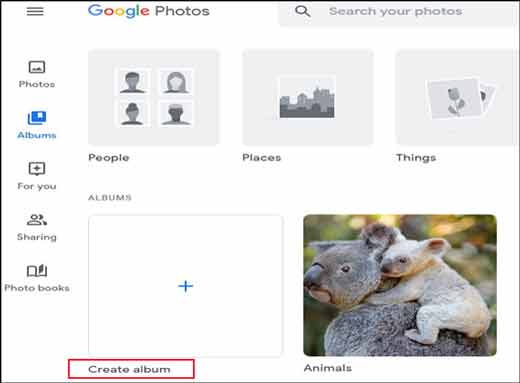
Step 3. Download Photos on the iPhone
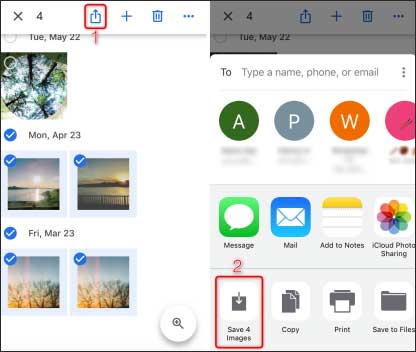
- Please download the Google Photos app on your iPhone, then launch the program. Sign in with the same Google account. Then you will see your uploaded photos on the app. If you want to download a picture, you can tap it and click the "Save" icon.
- If you would like to download multiple pictures, you can press and hold one picture until it shows up a blue checkmark. After selecting, hit the "Download" icon like a cloud on the upper right. Wait for minutes, the pictures will be downloaded to your iPhone.
Check if you need: Besides iPhone users, we are willing to offer tutorials for Android users. In order to help them transfer photos from Android to PC, there are 8 effective ways on it.
Part 4: How to Transfer Photos from PC to iPhone via iTunes
If you have downloaded iTunes on your computer, it will be easy to transfer photos to iPhone. There is no space limitation on iTunes, so you won't worry about the size of the photos at all.
Guide on how to transfer photos from PC to iPhone with iTunes:
Step 1. Download iTunes on Computer
If your computer hasn't installed iTunes, please download and install iTunes on the PC in advance.
Step 2. Connect iPhone to PC
Please connect your iPhone to the PC with a USB cable. iTunes will open automatically. If not, double-click the iTunes app. It will prompt you on the iPhone. Tap on the "Trust" option on the iPhone.
Step 3. Sync Photos from PC to iPhone
- iTunes will access your iPhone in a short time. Choose the "Library" tab and click the "Phone" icon on the left column. Choose the "Photos" category, and then tick off the "Sync Photos".
- You can choose the "All folders" or "Selected folders" in the second box. Besides the "Copy photos from", you can choose the folders on the PC and select your desired photos.
- At last, please tap on the "Apply" icon at the bottom. The photos will be synced from the PC to your iPhone soon.
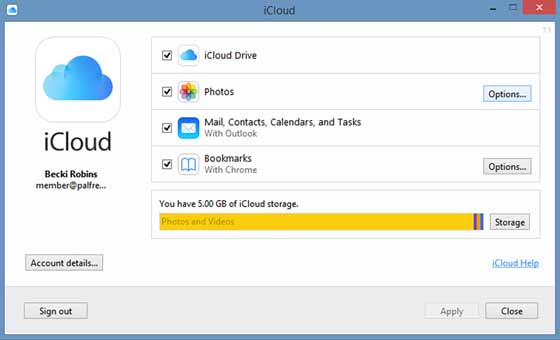
Kindly remind: If you switch on your iCloud on the iPhone, you could not use the "Sync Photos" on the iTunes, so you are required to turn off the iCloud on the iPhone.
Part 5: How to Get Pictures from Computer to iPhone with Dropbox
If you choose Dropbox to transfer your pictures to iPhone, you will only get 2 GB free space on it. At this point, many people suppose that it is too small. If you want to widen the storage, you should pay for it.
Here's how to put photos from computer to iPhone with Dropbox:
Step 1. Sign Up Dropbox on the Computer
If you don't want to download the Dropbox app on the computer, you can browse Dropbox on the web directly. And you need to sign up for a Dropbox account or choose to use your Google account to sign up.
Step 2. Upload Photos from PC to Dropbox
Second, when you enter the home page, you will see the "Upload files" on the right side. Click it to select your photos from the computer. Then click the "Open" on the window. Then you need to wait for some time if the photos are too many.

Step 3. Download Photos on the iPhone
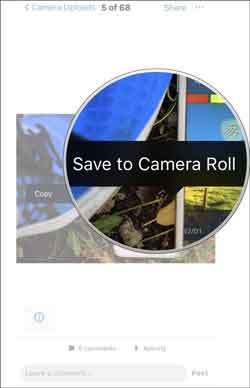
- Please download the Dropbox app on the iPhone and sign in with the same account you uploaded the photos just now. Then navigate to the photos that you uploaded. Tap on one of them and hold on it till the options bar appears.
- Click the "Save to Camera Roll". The photo will be saved to your iPhone Photos app.
Conclusion
5 solutions are provided for you on the article. And we believe you will get help from these methods above. If you make a comparison, you will find iPhone Photo Transfer is the most convenient tool to transfer photos to iPhone. And you can share this article with your friends. Besides, it is our honor that you write down your advice on the comment area or contacts us by email.
Related Articles:
How to Get Photos off iPhone 12/11/S/XS/XR/X Effortlessly and Quickly
Transfer Contacts from iPhone to Computer (PC/Mac) without iTunes?
How to Transfer Music from iPhone to Computer Effectively? (4 Tips)
[3 Ways] How to Transfer Books from iPhone to Computer
5 Ways to Teach You How to Transfer Videos from iPad to Mac Easily





 Download for PC
 Download for Mac
