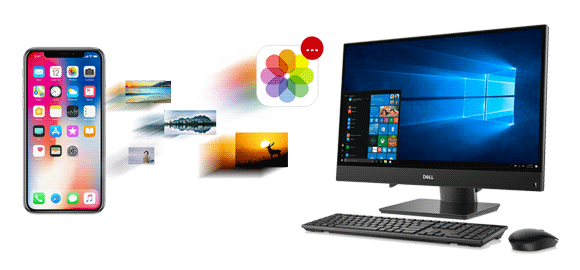
If you are an iPhone user, you have hundreds of photos in your phone that you've captured during your travels around the world. An iPhone is known for its wonderful camera qualities, and for that reason, it's used by many people to capture moments. However, smartphones are susceptible to damage. If you ever drop your iPhone or it gets wet, your precious photos might get damaged, and you can't afford to lose the pictures of your last trip to Dubai! Fortunately, there are ways you can use it to transfer photos from iPhone to PC.
Transferring photos from an iPhone is very easy. But a slight mistake can cost you, so it's best to know what you're doing. Doing it the right way can be difficult for some people, especially if you're unfamiliar with technology and computer jargon. Fortunately, we have outlined ways to help you properly transfer iPhone photos to a PC. Let's dive in.
The simplest way to transfer pictures to a PC is by connecting the iPhone to the computer with a USB cable and moving the photos using Windows File Explorer. Even though the process can be slow, it's still one of the best ways to safely get your images to the computer.
File Explorer is a Windows OS file management app that lets you browse files and folders. Its graphical interface allows users to navigate and get the files kept on the PC. You can also move and copy a file from one folder to another, browse the files in the computer, and open its contents.
How can you transfer iPhone pictures to PC using File Explorer and USB?
Step 1: Connect the device to the PC using the original USB cable, then unlock the device by entering the password. (Why can't I transfer photos from iPhone to PC?)
Step 2: You'll be prompted to Trust the Computer. Click on the "Trust" or "Allow" option to share files between iPhone and computer.
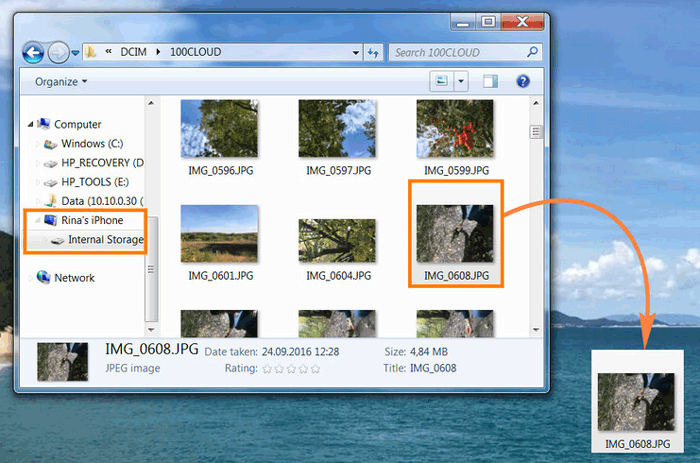
Step 3: Open File Explorer on the PC. You can find it on the taskbar in a folder-like icon. Or you can search for it from the search bar on the left bottom section of the screen. Click on it to open it.
Step 4: Find your iPhone from the Files Explore window below "This PC." Click on This PC to open a list of all connected devices. Your iPhone should be on the list. Click on the device to open it.
Step 5: Click twice on "Internal Storage" and head to "DCIM" to find the pictures on the iPhone. Select one image at a time by pressing the CTRL key and ticking the photos. Once done, right-click and choose "Copy."
You may like:
Top 9 Ways to Fix "Messages Didn't Transfer to the New iPhone"
How to Transfer Passwords to New iPhone Easily? (Latest iOS Supported)
For those who want to transfer their images wirelessly, you can do so via iCloud. iCloud is another feature provided by Apple to enables you to move iPhone photos to a PC.
This wireless transfer method saves you the hectic of connecting the devices through cables to make a connection. No need to plug your phone and cables into your PC's USB port; with just an internet connection and the right iCloud for windows, you're sure to have all your images on the computer quickly.
Apple offers 5 GB of free storage on the iCloud drive, which can keep your important pictures safe. You can still upgrade the storage if you want large storage. Before starting, ensure you have enough storage in iCloud. To transfer pictures wirelessly from iPhone to PC via iCloud, follow the below steps;
Step 1: Head to Settings on your iPhone and click on the Apple ID at the top of the Settings page. You will find your name in the profile picture. You can sign in with an Apple ID and password if you haven't signed in.
Step 2: Click on "iCloud" below the Subscriptions near the blue cloud button. You can check the storage space. Click "Photos" under Apps using the iCloud option.
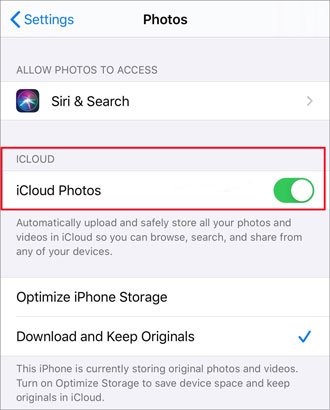
Step 3: Switch ON the "Sync this iPhone" option, and all Camera Roll pictures & videos will be transferred to the iCloud account when connected to WiFi.
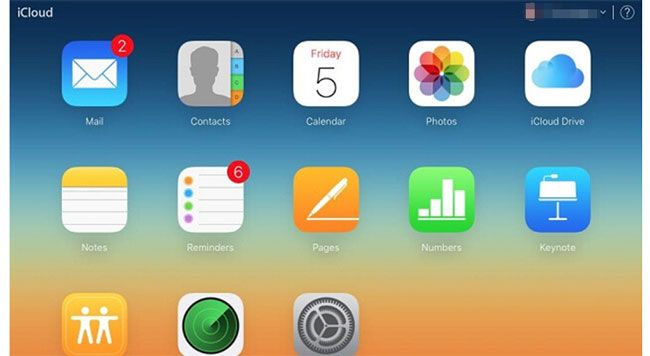
Step 4: On the PC, head to the iCloud website and input your Apple ID and passcode. Once done, tap on the arrow to sign in.
Step 5: Open the "Photos" app and choose "Photos." Activate iCloud Drive, then choose "Close."
Step 6: Choose the picture to download and choose photos by clicking the CTRL key and then clicking on every picture. Hit the "Download" button to download iPhone photos to your PC.
Another method to move your photos to a PC is by using email. Email is a great service that allows you to transfer files to others. Similarly, you can use it to transfer any of your iPhone photos to your PC. The best part is that the process is entirely wireless. Only an internet connection is required to have your precious memories on the PC.
If your computer does not support Bluetooth or the USB cables can't establish a connection between the devices, an email can help you share the images hassle-free. Besides, if you want to move the images to many people at the same time, this is the best option.
The only problem is that it takes a lot of time to download the images to the PC individually. Besides, ensure you send a few files not to exceed the size limit. But, so far, it's one of the best ways to share a few of your photos.
To move iPhone photos to PC via email, follow the below steps;
Step 1: Open the Photos app and choose the photos you want to send to the PC. Next, hit the "Share" option.
Step 2: Choose Gmail, enter your email address, and wait for the photos to attach.
Step 3: After the photos have been attached, press the "Send" button.

Step 4: On your PC, open any browser and log into the email you sent the files. Enter the Email address and password and sign in.
Step 5: Open the email to show the images and press the "Download" tab to download the photos to your PC.
See more:
How to Transfer Data from Broken iPhone to New iPhone? (4 Ways Out)
10 Ways to Fix the iPhone Migration Not Working Error without Trouble
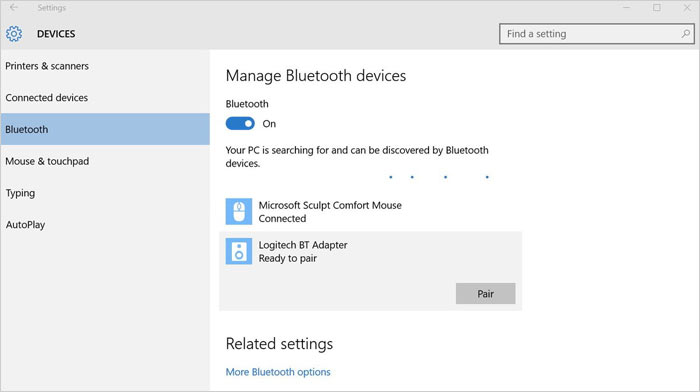
Some Apple users prefer Bluetooth to transfer their photos from iPhone to PC since the cables make the process challenging. The process is easier than any of the methods described so far.
Bluetooth transfer is a great option when you have many files that are too large. However, the process needs a lot of effort and time. Remember, the devices should be closer to allow the transfer to complete.
If you want to go ahead, here is how to do it;
Step 1: On your iPhone, head to Settings and turn on Bluetooth. Do the same to your PC and make the devices discoverable.
Step 2: On iPhone, go to the Bluetooth menu and search for nearby devices. Check the name of your PC among the devices and click on it. This will connect both devices via Bluetooth.
Step 3: Navigate to the Gallery on your iPhone and choose the images to move to your PC. Tap share via Bluetooth.
Step 4: Accept the transfer on the computer.
There are plenty of third-party apps you can use to transfer photos from an iPhone to a PC, such as SHAREit, Send Anywhere, Photo Transfer App, and more. To top it all off, you can use it without any restrictions, and it is completely free, but if you want a paid one, you can upgrade the plan.
For instance, the SHAREit app lets you move pictures by installing it on both iPhone and PC. As for Send Anywhere, you only have to generate the link with the authentication code to register an account.
So, choose the application that suits your needs. Let's see how to use the Photos Transfer App to copy photos from iPhone to Windows 10/11 PC.
Step 1: First, install the application on the iPhone. Next, open it. You'll see the options to Send or Receive pictures. Click on the "Send" option.
Step 2: Choose the "Windows" option underneath the option for "Send over WiFi." Make sure you connect the PC and your iPhone to the same WiFi to transfer images.
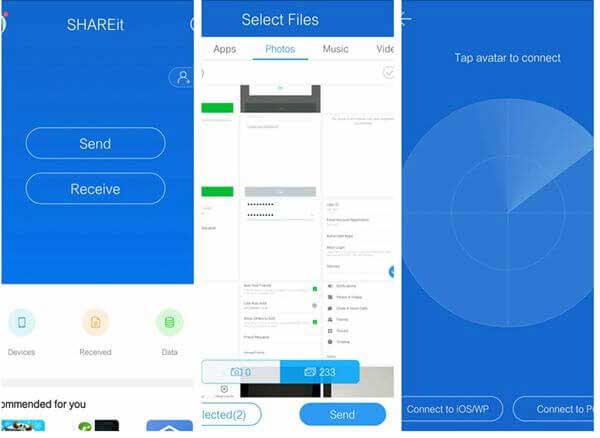
Step 3: Select the option for "Use Web Browser" to proceed.
Step 4: Press the "Select" button to select the photos to be transferred. You will also find the IP address to access the chosen photos on the browser on the screen.
Step 5: Open the browser on the computer and enter the IP. Once done, you'll get a notification that you will use to access the picture on your iPhone. Click on the option you want, if it's one time or always.
Step 6: You'll then see the selected pictures on the PC. Right-clicking on the image will initiate the downloading process.
If you want a convenient way to export all photos from iPhone to PC at once, use an external flash drive. Simply insert the flash drive into the iPhone, save the photos you want, connect it to the computer, and copy the pictures.
Using a flash drive is a great option if you're worried about the size limit of an email or don't have a Bluetooth-enabled device. Besides, a flash drive will be useful in storing your pictures and videos on it first before uploading them to the PC, which is a win-win for you. The process is straightforward. Just follow the steps below;
Step 1: Connect the flash drive to USB-C Adapter, then connect the adapter to your iPhone.
Step 2: Wait for the iPhone to detect the flash drive. Open the app containing the pictures to be transferred.
Step 3: Choose your desired pictures and click on the share icon at the lower part of the screen on the left. Choose the "Save to Files" option.
Step 4: You'll find locations you can transfer the photos to. Choose the flash drive as the location. Click on the "Save" option to save the images to a flash drive.
Step 5: Now, take the flash drive and connect it to your PC. Click on Files Explorer and head to "This PC." Locate your flash drive among the computer devices and drives.
Step 6: Go to the folder you saved the pictures and copy them to your PC.
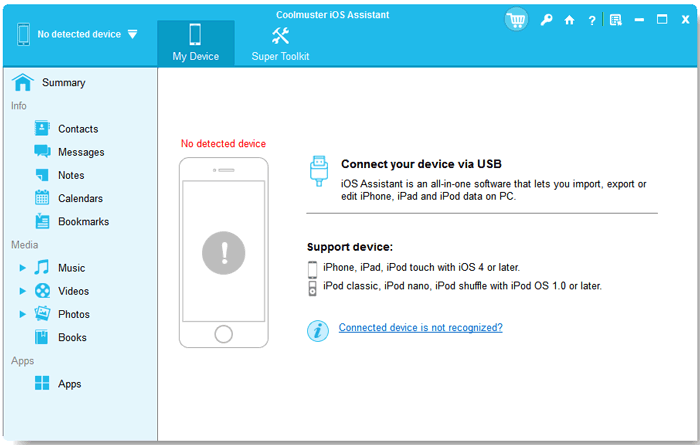
The most annoying part of sharing files from one device to another is sending them one at a time. This can take a long time and be very frustrating. Fortunately, we'll introduce you to a great tool that can transfer all iPhone photos to a PC in one touch. Coolmuster iOS Assistant is that tool you shouldn't miss whatsoever. It can export all photos from iPhone to PC quickly and effortlessly. It transfers not only photos but also contacts, videos, music, call history, SMS, etc.
This is the best iPhone data manager to look for whenever you want to share files between devices. It's quite simple to use, even for the starters, and it's widely compatible with Windows and Mac OS.
How iOS Assistant Can Help:
* Transfers iPhone photos to computer after previewing and selection.
* It can back up and restore all files on iPhone in 1 click.
* Manages iPhone files fully on the PC.
* You can freely add, edit or delete iOS data directly on a PC.
* Supports varied generations of iPhones, iPods, and iPods, and it supports iOS 16 versions.
* Works on Windows XP/Vista/7/8/10/11.
Now let's look at how to transfer photos from iPhone to pc windows 11/10/7 via iOS Assistant:
01 Download the Windows version of the app and launch it. When you see its primary interface, connect the iPhone to the PC with a USB cable. Click "Trust" when asked. Press "Continue" to proceed.
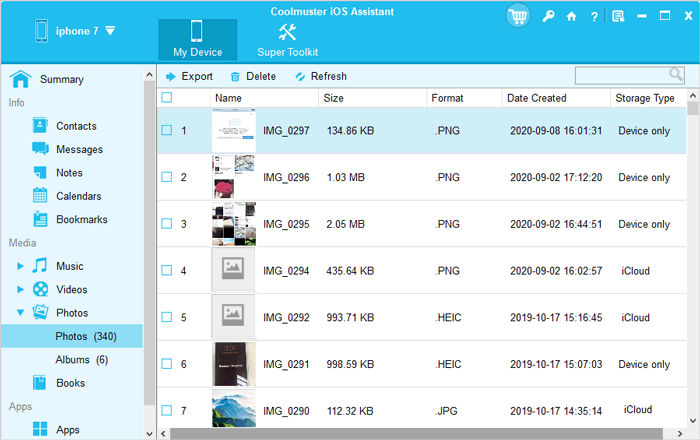
02 After the device is detected, you'll see all your iPhone data on the main interface arranged in folders on the left panel.

03 Click on the "Photos" folder, preview the pictures and choose the ones to export to the computer. Once done, click the "Export" button to move the pictures to the PC.
Video guide:
That's all about transferring iPhone photos to a PC. If you want the easiest way to transfer photos from iPhone to pc, we recommend using Coolmuster iOS Assistant. It's a reliable and powerful tool that shares files between devices in 1 click.
Related Articles:
iPhone "Save Image" Not Working, How to Fix?
Photos Didn't Transfer to New iPhone? Work It Out with Easy Solutions
Transfer Viber Messages to New iPhone [Including iPhone 14/13]
Contacts Didn't Transfer to New iPhone? 7 Flexible and Easy Fixes


 Free Download for PC
  Free Download for Mac

