Part 1. Easy Way to Transfer Photos from iPad Pro to Computer
Part 2. How to Sync iPad Photos to iTunes library?
We all know that in order to protect the authority and copyright, it is hard for users to export files from iDevices to computer. So if you want, you need an iPad Photo Transfer program to help you, such as Coolmuster iOS Assistant and Coolmuster iOS Assistant for Mac.
Why Choose Coolmuster iPad iPhone iPod Transfer?
Undoubtedly, you can find lots of transfer tools for iOS devices on the market, but for most users, they may want to find a professional and reliable tool to transfer data from iPad, iPhone and iPod to PC. That is mainly because of a good tool will guarantee the file quality and you don't need to worry about data loss. Thus, this program is developed by a professional team and all your needs we have taken into considerations. With it, you can:
- Easily export photos from iPad to PC with high quality and fast speed;
- Not only transfer pictures, but also copy music, movie, TV shows, podcast, etc. from your iPad, iPhone and iPod;
- Fully compatible with all models of iPad, including iPad Pro, iPad mini, iPad 2, the new iPad, iPad Air, etc.
Now, just click the below icons to try the iPad Photo Transfer free download version. If you're satisfied with the transferring effects, then please don't hesitate to take it home.
Also Read:
How to Make Slideshow out of iPhone Photos
How to Transfer Photos from iPhone/iPad to Flash Drive
How to Transfer Photos from Camera to iPhone/iPad/iPod
Part 1. Easy Way to Transfer Photos from iPad Pro to Computer
Note: Here, we want to take the Windows version as an example. If you're a Mac user, please download it on your Mac and try to transfer it according to the below same steps.
Step 1. Connect iPad Device to Your PC and Run the Program
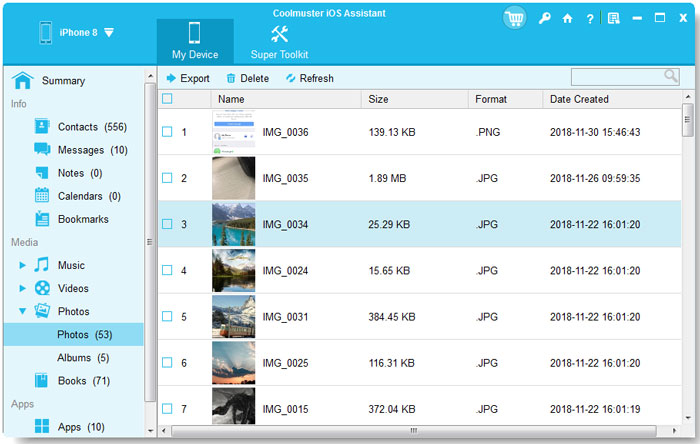
Connect your iPad 2, iPad mini or the new iPad to PC via USB cable, and then double-click this program to launch it. It will detect your iPad and show the details in the main interface just like below picture shows:

Step 2. Preview the Scanned Photos and Ready to Export
In the left panel, you can see that all files on your iPad have been categorized into different folders. For Photos, just click "Photos" and mark all pictures you want to transfer at one time. Then click "Export" on the top of the panel to export all pictures to your computer quickly.

At this time, you have already successfully transferred iPad photos to computer. Now, let's start to sync iPad pictures to iTunes library together!
Part 2. How to Sync iPad Photos to iTunes library?
After transferring the iPad images to computer, you can now start to sync iPad photos to iTunes library now. Here is the instructions:
Step 1. Open iTunes on your computer and connect iPad to your computer via USB cable. Make sure you have downloaded the latest iTunes on your computer.
Step 2. Hit the iPad icon on the left top of iTunes windows.

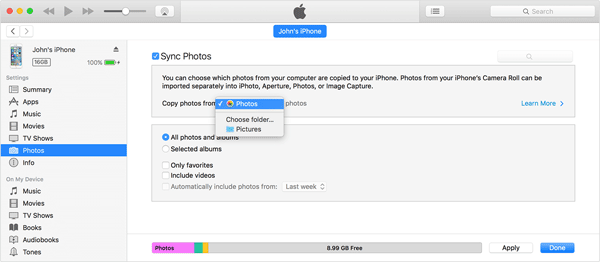
Step 3. Click "Photos" tab on the left panel, then select "Sync Photos" option on the right panel, and choose the source that you want to sync photos from, like App or folder on "Copy photos from..." option.
Step 4. You can also choose to sync all photos or specific albums or videos. After selection, you can hit "Apply" option to start transferring iPad photos to iTunes library immediately.

That's the whole process for transferring photos from iPad to computer or iTunes library. Simple as it sounds, right? If these software have met your demands, just click the blow links to take it home.
Related Articles:


 Download for PC
 Download for Mac
